Low Poly

Low Poly refers to modelling in 3D games where the polygon count of models created is stylistically kept at a low number for a more cartoonish look. This technique can be applied to any 2D photo via Photoshop by selecting an area, using the polygonal lasso tool and filling it with the average colour of that selection (via filter>blur>average). After many of these polygons build up, a Low Poly design is made.

Original Photos

To start this project I picked out two photos, one from google images, simply because I thought it would look interesting in Low Poly, and the other was a photo taken of my face. I chose the photo of my face to test the level of detail I can achieve in smaller areas, such as my eyes. I would do this by increasing the polygon count around the smaller areas that require more detail, but decreasing the polygon count in the areas that are relatively consistent in colour and doesn’t require much detail.

Process

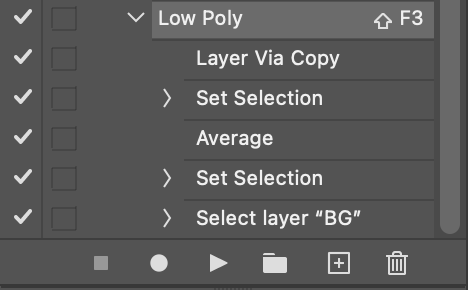
In order to make the process of creating these designs quicker and easier, an action shortcut is made (and in this case bound to shift+f3). To create this action, I started by naming the main image layer “BG”, creating my selection by using the polygonal lasso tool and making sure the BG layer was selected. After hitting record in the action window, I used the shortcut ctrl+j, which created a duplicate player of the selection. Due to this shortcut deselecting the selection made, I reselected the content within the duplicated layer by ctrl+clicking on the layer’s image. Then I went to filter>blur>average to fill the selection with the average colour and deselected the layer using ctrl+d. Since I wouldn’t want to select the BG layer manually everytime I use the action, before ending the recording of the action I finally selected the BG layer.

When creating selections, I only ever used triangles and only roughly placed them edge to edge, this can be easily fixed later by selecting individual triangles and transforming until placed edge to edge. Another way to fix the gaps was to keep the original image on the layer below which, providing the gaps between the triangles were small, would make them pretty unnoticeable.

Final Designs

To finish off my face design, I decided to replace the background with a solid colour as the straight edge of the polygons allowed me to do so. My favourite of the two designs has to be my face due to how effective adjusting the polygon count was around the eyes compared to around the cheeks, though the coffee cup definitely looks a lot more 3D. This could be a result of the much lower polygon count all around. The technique is very time consuming but delivers a very interesting effect when the polygon count is managed well and, compared to the results of using an online Low Poly image generator, definitely looks better.